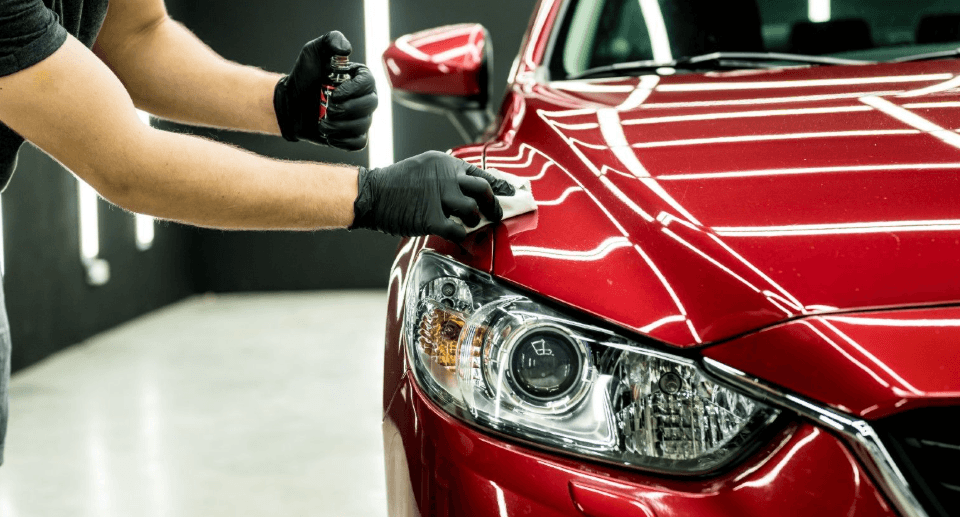
You want your car to look better and stay protected with less effort. Ceramic coating creates a hard, water-repellent layer that shields paint from UV, contaminants, and light scratches, making maintenance easier and preserving finish longer.
This article Ceramic Coating Car Guide explains what ceramic coating actually does, which benefits matter most, and how to choose and apply the right product for your skill level and budget. Expect clear, practical guidance so you can decide whether a DIY spray, a professional-grade ceramic, or a shop-installed system fits your needs.
Key Benefits and Core Functionality
Ceramic coating gives your paint a hard, chemically bonded layer that changes how water, contaminants, and UV light interact with the surface. It reduces the time you spend on waxing and routine care while preserving paint clarity and shine.
Enhanced Protection Against Environmental Damage
A ceramic coating forms a SiO₂-based polymer layer that bonds to your car’s clear coat, creating a barrier against UV rays, chemical etching, and light oxidation. This layer reduces clear coat degradation from sun exposure, helping prevent color fading and loss of gloss over multiple years rather than months.
The coating also adds hydrophobic and oleophobic properties, so water beads and rolls off instead of sitting and leaving mineral spots. That behavior cuts down on water-spot formation and makes light contaminants easier to remove. Note that ceramic coatings are not scratch-proof; they resist marring from light abrasion but won’t stop deep scratches or rock chips.
Superior Gloss and Appearance Retention
Ceramic coatings increase reflectivity by filling microscopic surface imperfections, which enhances depth and clarity of the paint. You’ll notice a more consistent, high-gloss finish that lasts longer than conventional wax or sealants.
Because the coating bonds to the clear coat, it reduces the rate at which environmental fallout and UV damage dull your paint. That means the factory or professionally corrected finish you start with remains visually closer to new for years. Maintain correction before coating; the coating preserves the surface you give it rather than improving scratched or swirled paint.
Simplified Cleaning and Maintenance
Hydrophobic properties make routine washes faster and less frequent. Dirt, brake dust, and road grime have a weaker bond to the surface, so they rinse off easier during a proper wash. You’ll spend less time on labor-intensive decontamination like claying or repeated waxing.
Create a basic maintenance routine: two-bucket wash, pH-neutral shampoo, and periodic inspection for bonded contaminants. Use dedicated ceramic-safe toppers if you want added sacrificial protection. Expect lower long-term maintenance hours, though occasional corrective polishing may still be required to address heavy swirls or localized damage.
Selecting and Applying Ceramic Coatings
Choose a product that matches your goals—durability, ease of application, and maintenance needs—and prepare your paint to a defect-free state before coating. Proper technique and environment determine whether the coating bonds uniformly or creates high spots.
Types of Professional and DIY Options
You can pick professional-grade coatings that require a trained installer or consumer kits designed for DIY application. Professional systems often use higher SiO2 concentrations and multi-layer protocols; they promise longer warranties and chemical resistance but require paint correction and controlled curing conditions.
DIY kits vary from single-step, low-SiO2 “spray sealants” to 1–2 year liquid coatings with moderate SiO2/TiO2 content. Look for clear labels on expected longevity, curing time, and required prep. Consider kit inclusions: applicator pads, microfiber cloths, and isopropyl wipe solutions reduce unknowns and improve results.
Budget for paint correction, inspection lights, and proper PPE. If you lack polishing experience or have heavy swirl marks, opt for professional application to avoid locking in defects.
See also: Drywall Repair: Expert Techniques for Fast, Durable Fixes
Critical Application Steps for Best Results
Start with a full wash using a pH-neutral shampoo, then decontaminate with a clay bar or iron remover to remove embedded fallout. Dry the vehicle completely and inspect under good light to find swirls, scratches, or etching that require correction.
Perform paint correction (compounding/polishing) until defects are removed; ceramic bonds to the clear coat, so imperfections become permanent under the coating. Use isopropyl alcohol (typically 10–20% in water) or manufacturer’s prep solvent to remove oils and polish residue right before application.
Work in a cool, dust-free environment and apply in small panels (2×2 ft). Use the provided applicator, follow the specified flash/level time, and buff with a clean microfiber in cross-hatch passes. Respect the curing window—avoid washing or exposure to moisture until the coating reaches at least its initial cure time.
Common Mistakes and How to Avoid Them
Skipping paint correction locks defects under the coating; always correct and verify your work under bright, angled light. Failing to properly decontaminate or wipe down leaves oils that cause high spots—use a dedicated prep solvent and fresh microfibers.
Applying too much product causes pooling or streaks; follow the product’s recommended application amount and wipe pattern. Rushing the flash time or applying in hot direct sun leads to uneven bonding—work in shaded, controlled temperatures and test small areas to learn timing.
Not following layer timing or post-application care (no washing, no automatic car washes) can reduce durability. Read the technical data sheet for flash time, layer limits, and aftercare, and keep tools and cloths clean to avoid recontamination.